Why Your Suspension is Holding You
Back (And How to Fix It)
– By Mel of StokedMTB
Let’s be real: Mountain bike suspension can be intimidating. Your fork and shock have more
knobs and dials than the space shuttle. If you’re like most of us, you either touched them once
three years ago, got confused, and haven't looked at them since—or you haven't touched them
at all.
I have seen this countless times on the trails and in my coaching sessions. But here’s my
secret sauce: You don’t need a degree in rocket science to make your bike feel better. You just
need to understand three simple things.
In my experience, you can have the best body position in the world, but if your suspension isn't
working with you, you’re fighting the bike instead of flowing with the trail. Dialing in your settings
to match you and your style is the single biggest boost you can give your confidence—and
enjoyment—on the dirt.
The Three Pillars of "The Squish"
If you want to ride with more confidence and less fatigue, I always recommend mastering these
three basics first:
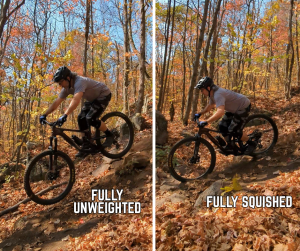
1. Sag: The "Goldilocks" Zone Think of Sag as the foundation of your bike. Simply put, sag is
how much your suspension squishes down just by you sitting on the bike. This allows the
suspension to absorb the bumps and extend into holes to give you a smooth and stable
platform.
● The Goal: You want the bike to use about 25-30% of its travel just from your body
weight.
● Too little sag: Your bike feels like a rigid wooden board. You’ll bounce off every root in
Ontario.
● Too much sag: You’ll "bottom out" (clunk!) on every drop, and the bike will feel like a
wet noodle.
2. Rebound: The Pogo Stick vs. The Sofa This is the red dial. It controls how fast your
suspension "bounces back" after it hits a bump.
● Fast Rebound: Imagine a pogo stick. It’s poppy and fun, but if it’s too fast, the bike will
try to buck you off like a wild horse after a jump.
● Slow Rebound: Imagine a memory foam mattress. It’s stable, but if it’s too slow, the
suspension won't have time to reset before the next bump, and will get packed down in
successive bumps.
● The Sweet Spot: You want it fast enough to be lively, but slow enough that the bike
feels "planted" and calm.
3. Compression: The "Brake" for Your Squish This is usually the blue dial. If Rebound is how
the bike recovers, Compression is how it resists the initial hit.
● Low Compression: The bike feels plush and soaks up everything, but it might "dive" too
much when you hit the brakes or go around a corner.
● High Compression: The bike stays high and firm, which is great for pedaling uphill or
jumping, but it can be harsh on your wrists over the chatter.
Finding Your Baseline
I don’t want to turn this into a day-long science experiment. Here is my "quick and dirty" guide to
getting in the ballpark. (Read to the bottom if you want work through this process in person with
us!)
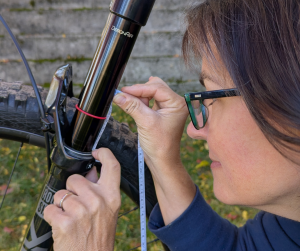
1. Set Your Sag: Wear your riding gear (including your pack!). Get on your bike and
bounce up and down a few times to cycle the suspension. Then have a friend steady
your bike while you stand on the pedals in your neutral riding position. Have your friend
slide the O-rings against the seals and carefully hop off. If that O-ring is 25-30% of the
way down the shaft, you’re golden.
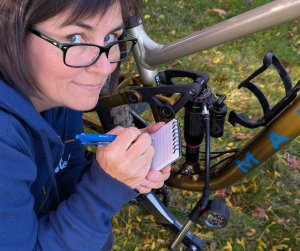
2. Find the Middle: For your red and blue dials, turn them all the way in (+) and then all
the way out (-), counting the "clicks" as you go. Set them right in the middle as a starting
point.
3. The "Bracket" Method: Go to a short trail you know well or section of trail you can
easily repeat. Ride it with your baseline settings. Then, turn a dial two clicks in one
direction and ride it again. Did it feel better or worse? If it's better, try one more click. If
it's worse, go back. By "bracketing" the feeling between two extremes, you’ll find that
sweet spot in the middle.
Mel’s Pro Tip: When setting suspension, it is very important to only make one change at a time.
Otherwise you won’t know what made things feel better or worse!
Is Your Suspension Due for a Refresh?
Before you start clicking dials, you have to make sure the "guts" of your bike are actually clean.
If your seals are dry and your fluid is old, no amount of tuning can make it feel plush.
The 50-Hour Service: Think of this as your "oil change" to keep things smooth and reduce
friction (stiction). Typically this service is needed once per riding season.
The 100-Hour Service: This is the deep dive—fresh seals and a full reset to factory
performance. This services is typically done after 2 season of riding.
If your bike sounds 'squelchy' or feels sticky, stop turning the knobs—it’s time for a service.
While it’s an added cost, a fresh service is the best way to restore that 'new bike' feel and
ensure your suspension can do its job.
Your Best Ride is a Tailored Bike
At the end of the day, demystifying your suspension and empowering yourself to make changes
is one of the biggest upgrades you can give your riding. A dialed bike allows you to ride with
more confidence, which in turn leads to more flow, more speed, and way more fun.
While there’s a plethora of videos and articles out there, I know that digital tutorials aren't for
everyone. If you’re a hands-on learner like me, or you want to walk through these steps with in-
person, expert guidance, it’s time to grab your bike and join us for our Suspension 101
Workshop.
Check it out on our website and socials, shoot us a message with any questions you have. We
can’t wait to see you there! You’ll be shocked at what a forkin’ good time you’ll have!